Nissan Armada & Infiniti QX56 Forums banner

Stiffen up the front swaybar with this cheap easy mod

26K views 33 replies 19 participants last post by  Phantera9mada  
#1 · (Edited)
Hi guys,

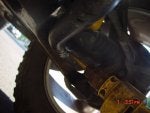
I just tried this mod and it worked so well I thought I would share it. It really makes a big difference in reducing body roll. The front swaybar on our Armada's is huge, but it is hollow. That keeps weight down and stiffness decent. As with any tube, if you twist it the tube collapses. By filling the tube with foam it resists collapsing of the tube and thereby stiffens the bar without adding much weight.

You are going to need spray foam. I used a Dow product called "Great Stuff" it comes in a few grades. I used the black can, "Big Gap Filler" which I was told has a 4:1 expansion ratio. If you can find a more rigid foam, the mod will work even better. This stuff is available at any Home Depot for about $5.00. You only need 1 can. You will have plenty left over to use on a home project.

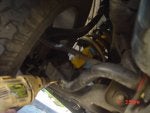
I used a unibit and a cordless drill to dill a 1/8" hole in each end of the swaybar. I drilled it just in the location where the bar begins to flatten out. Next step is to shake the can well and then inject the foam into the bar on one side. After about a minute you will see it escaping out the vent hole in the other end of the sway bar. plug off that hole with electrical tape or if you have anything else that will stop the flow you are good. Go ahead and spray more foam in there to make sure it is packed out. I went another 15 seconds after I first saw it leak out. Plug the other side. Do not drive the car for a day to allow the foam to fully cure to full hardness. Also make sure you are on level ground so you don't introduce any preload during cure.

It is temping to use heat to speed up the cure but what happens is the outside will expand that is in contact with the heat and the inside will not since foam is such a good insulator, so it makes it more spongy. The 4:1 expansion rate is plenty to do the job at room temp. couple this mod with some new urethane rear swaybar bushings and it really wakes the truck up.

I would say the foam makes a 15-20% increase in stiffness. Best $5.00 and 10 minutes you will ever spend on the truck, guaranteed!

Anyone tried it yet? Let me know how it works for you.
 
#2 ·
I will try it


Sent from my iPhone using Autoguide
 
#3 · (Edited)
You have a 2" lift right. It should still work pretty good. do you have 2" spacers on the swaybar rubber mounts to keep the geometry the same? or maybe 2" longer end links?

I just took it out again and drove it a little harder than before. It really corners flat now. I may have been a little too conservative in my estimate above. I don't want to over hype it though. This is not a mod I found somewhere, I made it up myself so I am biased. I would like someone more skeptical to give it a try and report back. I've never posted pics on this site but let me know if you need any pics.
 
#5 ·
Would this benefit the rear sway bar as well?
 
#7 · (Edited)
PathArm, I'm not sure if those adhesives will work. You need something that expands enough to fill the inside of the swaybar and then cures hard. You are really looking for a gap filler, not necessarily an adhesive. Also the spray foam is really easy to spray in and fill the swaybar. If this adhesive is in a tube and you are squeezing it in with it not expanding that's not going to work. It has to be packed tight to work. Hmmm . . . maybe a calking gun could generate enough pressure? Someone will have to try that but keep in mind you get only one shot to get it right. I don't know, at the end of the day is caulk/silicon more rigid than foam? Might be splitting hairs in stiffness while increasing weight and cost quite a bit.

The company Hilti makes a foam if I remember correctly. I first did this mod about 10 years ago on my Nissan Frontier S/C which has a hollow rear swaybar. I could not find it this time though. The stuff I got from Home Depot works fine. I recently spoke with the new owner of that Frontier and this mod is still working great. That leads me to Wonderlyeric's question.

The rear swaybar is solid on the Armada, so there is nowhere to inject the foam. Stiffening the rear bar reduces understeer or that tendency for the truck to go straight when you turn. Stiffening the rear makes it feel more like it is on rails when you corner. A set of urethane swaybar bushings makes a big difference there. You can get them from Summit racing, ebay etc as a direct bolt on replacement. These two mods work nice together.

I have modded the suspension in every vehicle I have ever owned. One thing that typically happens when you improve handling, the car seems to settle down and turn quicker, easier with less drama. If you make a large enough change, you find yourself turning off the the road on the inside of the corner because it takes less time for the car to react and less effort to steer. I was doing that during the first week after this mod while I got used to the truck again. Before I did this mod I already had urethane swaybar bushings front and rear (2 years ago) and then Bilstiens up front (3 months ago). To put it in perspective, none of those mods had me turning off the inside of the road.

Anyone try it yet?
 
#11 · (Edited)
OK Let's try some pics (first try). The first shot shows what you need, a drill with a unibit works best because the swaybar is pretty hard, tough to drill.. You need that the foam and some electrical tape to stop the flow. No need to jack up the truck. You drill each side to the first diameter of the unibit (maybe 1/8" or so diameter) about 1-2" inboard from where the swaybar is crimped flat. Repeat on the other side. Shoot foam in on one side until you see it escape out the other hole. After you first see it escape (which should take about a 45 seconds or so), keep spraying for another 10-15 seconds to ensure it is packed out. Use electrical tape to cap off both sides (like the second photo). Don't use heat to cure, this foam expands 4:1 at room temp. Don't drive it for 24 hours so it can cure fully.

It literally takes about 10 minutes to do.

Hope this helps!
 

Attachments

#13 ·
No problem. I just want to hear back from you guys after you try it!
 
#14 ·
What is that antique gun looking thing with a cord attached?? Can't remember seeing one of these in years!! LOL
 
#15 ·
I know. Remember the hassle! Almost as bad as finding your primary and backup batteries both dead when you need them. The absolute worst one was the corded skill saw.


Sent from my Autoguide iPhone
Scott
 
#16 ·
That's exactly what happened. My batteries were dead so I pulled out my trusty Dewalt!
 
#17 ·
Another one to try the sway bar filler

I removed the sway bar, because when I bought my '05 this past June, I knew it had been damaged. Per the dealer, the former owner stated he had hit a deer in '09 -driver's side damage. I tried twice to re-align the sway bar, but with one of the aluminum (?) rings no longer remaining in place, I decided I better weld some permanent welds so it would no longer allow movement towards the driver's side. Both times when I tried to align it, she handled great, until some time where the sway bar moved towards the driver's side.

Now, she ain't gonna move any more. Both aluminum clips now have nowhere to go but where they're supposed to stay. Hoping the sway bar remains centered.

As for the thread topic..., I drilled my two holes at the crimped sections. Shook up the can and sprayed, and in maybe "2" seconds the filler was gushing out the other end - WTF happened to 45 seconds? I didn't use duct tape on the other end hole, just an old glove - what a mistake. As I had to pull out the tube to now plug the far end hole, I had a gusher on my hands back where I had pulled out the tube. It spewed onto the floor, on my work bench, and on my shirt.

After taping up both ends as tightly as I could with duct tape, I headed back indoors to try to remove the gunk from my hands. I've had experience with that "great stuff" before, and just don't seem to want to waste gloves, because that stuff is so nasty on anything it touches. At least with my hands, I can wash them and in 5-7 days the dark **** look is gone.

Q for anyone - how should I know the link ends need replacing? The links are still attached to the sway bar, and seems iffy that I can remove them without grinding the bolts off. I thought I could find a second MOOG end link to match the one I had bought months ago (hadn't installed yet), but nobody's stocking them locally. I'll try tomorrow for some stores in the Milwaukee area. Both ends have good non-cracked rubber casings.

Thanks, Eric.
 
#18 ·
Just a couple of questions...

This seems like a great, and, almost more importantly, inexpensive mod that can really make these 3 ton beasts really agile. Just a couple of concerns on my inexperienced part though...

My first question. Does drilling holes in the sway bar make it lose any structural integrity? It seems to me that drilling holes close to the ends like that may make the bar, especially since it was hollow to start, less rigid.

Next question, are there any other "testers" out there to, for lack of a better term at this early hour, validate this mod?

Thanks.
 
#19 · (Edited)
ewojcieszak, Wow you must have really shook it up good. or maybe not enough and you were pumping fluid through instead of foam? 2 seconds? Yes once it starts to drip wrap it with electrical tape on the far end. I did it in the street so I forgot about the part about protecting your garage floor. Rubber gloves would definitely be a good idea. The good news is if it was gushing that hard and you stopped the flow, for sure you have no voids and it should work great.

Do you have play in your end links? Are the seals still in tact? If you have any play or busted seals replace them. You can get a open end wrench on the back side (look for the flats next to the rubber boot) and a socket on the front. I had my endlinks off before when I installed my Bilstiens and it was not that hard to do. Put that puppy back on the truck and let us know what you think.

jcandrews310 It is standard practice if there is a crack in sheetmetal to drill a hole in the end of the crack to stop it's propagation. It is unlikely that a crack would start from a hole. And again keep the holes small. There is no advantage to putting a large hole. You want the foam packed tight with no voids and the highest density for best performance so cooler temps are better. I only used the first portion of a unibit so maybe 1/8" is plenty good. I can say the mod has lasted 10 years in my old Frontier and is still going.

I think we all would like more feedback from you guys after you try it!
 
#20 ·
I'm going to give this a try next weekend! Thanks for the post!
 
#21 · (Edited)
Hope you like it!

My daughter came home over the weekend and I let her borrow it without telling her I changed anything. She took my 9 year old on a errand. Nothing gets by my 9 year old. He said his sister kept turning off the inside of the road nearly bumping the curbs. The truck turns much quicker, flatter way less drama so it may take a little time to re-adjust and be a little less hamfisted. That's a good problem in my book.

When you go up against other SUVs where you have to change direction after this mod it is like taking candy from a baby.

Enjoy!
 
#25 ·
Did you ever get to install the Stillen?
 
#24 ·
Now your talking!
Stillen Swaybar! adding that to my must have list.

No disrespect to the original poster, but that drilling and foam idea is not my style. Allthough, it would be interesting to see how it holds up for 100,000 miles. (my guess is it would slowly go back to stock after the foam gets chewed up from use)
 
#26 ·
Stillen sells the sway bar right from there site for less and free shipping.

Any other mods that one should do for suspension and ride along with this from OEM? I know the Blisten HDs.